Using Postman with Hover's API
This tutorial will walk you through setting up an environment with Postman to interact with Hover's API
What Is Postman?
Postman is a popular and widely-used tool for testing, documenting, and interacting with web APIs (Application Programming Interfaces). It provides a user-friendly graphical interface that allows developers and testers to make HTTP requests to APIs and view the responses. Postman is especially valuable during the development and testing phases of software projects, as it simplifies the process of working with APIs
Before You Start
- Download Postman
Postman has a web application and a desktop application. To download the desktop version, please go here.
- Import Hover's Postman Collection
Clicking the Run in Postman button below will import Hover's Public collection into your own Postman workspace.
- Make sure you have access to a Hover account via your web browser. If you don't have a Hover account, you can reach out to [email protected] for support getting a test account and organization.
- Within your Hover org, you will need a set of API credentials (Client ID and Client Secret). You can obtain these credentials by following our instructions here.
Authenticating with Hover's API
Now that you're all set up with Postman and you have a set of Hover API credentials, it's recommended that you read our guide that introduces the OAuth 2.0 Authorization Code Grant Type flow in the context of authenticating with Hover.
Setting up your Postman Environment (optional)
We have a script available for you to enable within your Postman environment if you'd like to automate the authentication flow moving forward. This script uses Postman's Pre-Request Script function along with a few configured environment variables. You don't have to add these variables and script, but they will speed up your ability to authenticate with Postman while you test/build your integration.
In order for this script to work, you need to add the following Environment Variables (which are case sensitive):
| Variable Name | Variable Value |
|---|---|
| url | https://hover.to> (depending on the environment you are accessing) |
| client_id | Your application's Client ID |
| client_secret | Your application's Client Secret |
| callback_url | Your application's callback_url value (when you set up your integration in Hover) |
| access_token | leave this blank |
| refresh_token | leave this blank |
| token_created_at | leave this blank |
Obtaining an Authorization Code
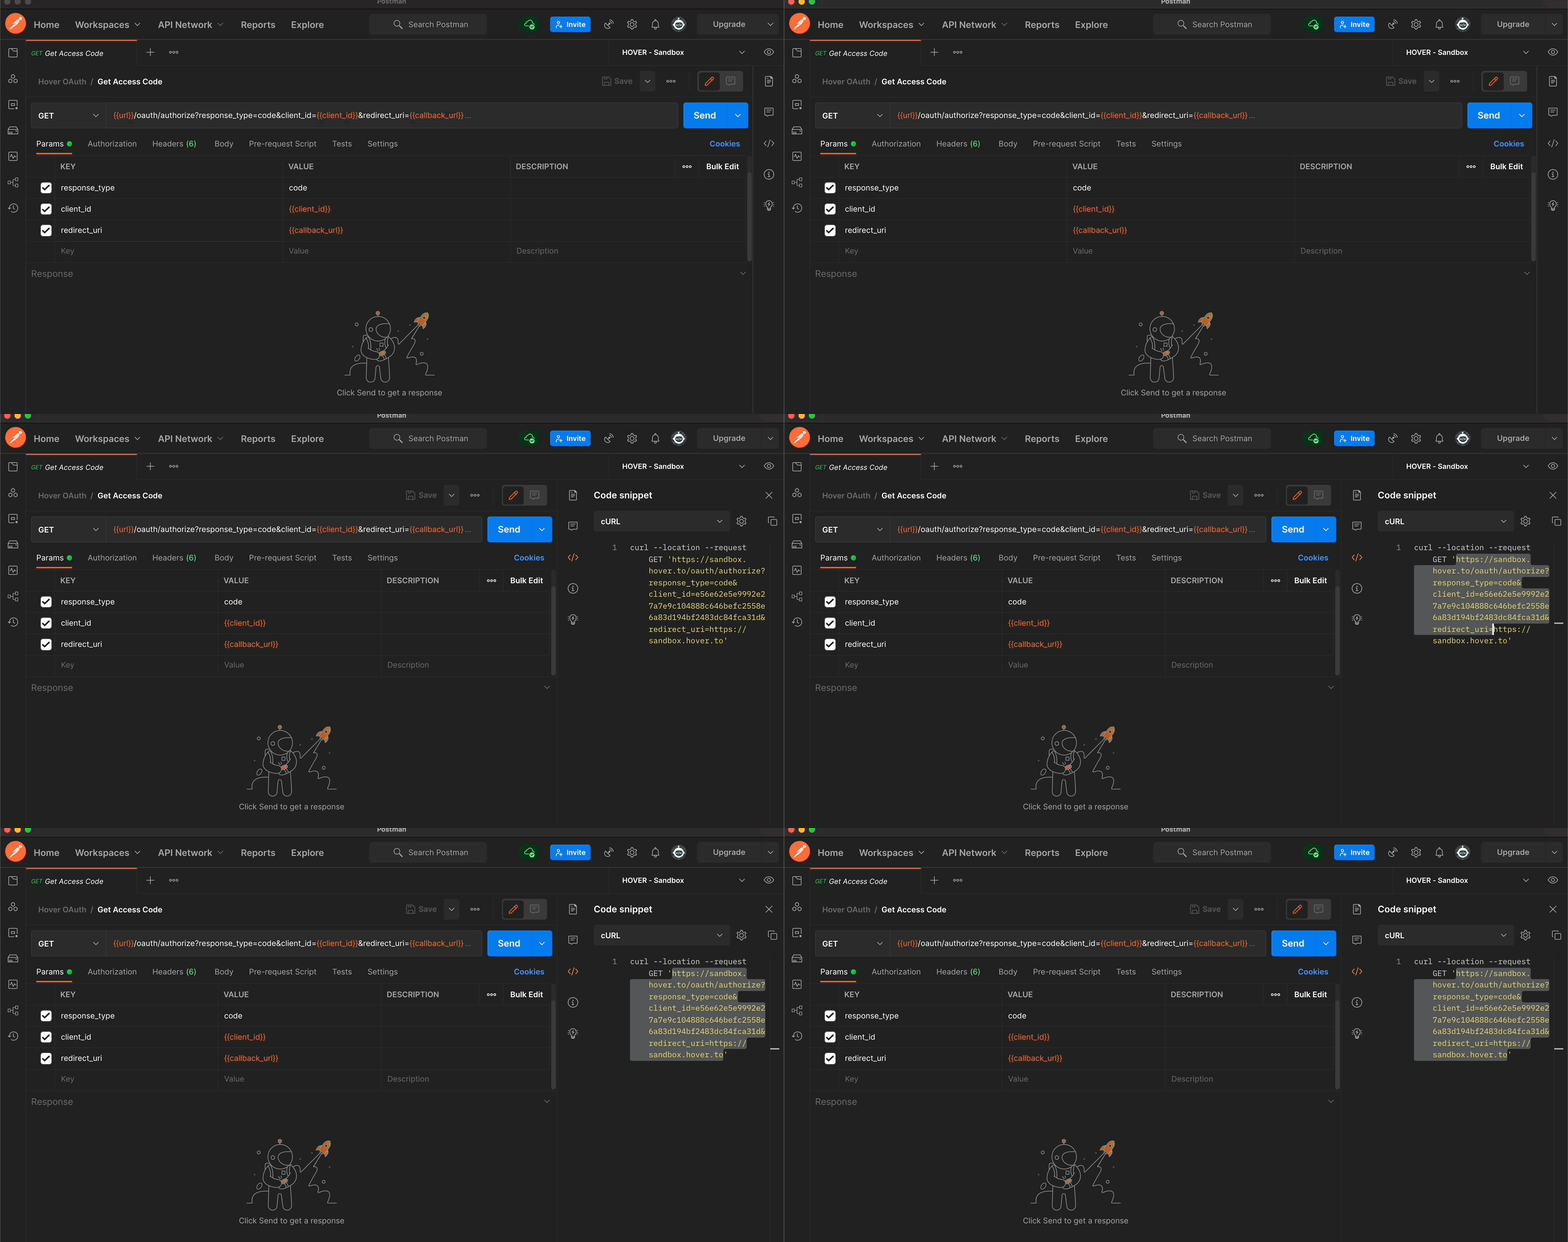
- Using the newly-imported Hover REST API Collection, navigate to the
GET Access Coderequest within theOAuth 2.0folder. - On the right-hand side of your Postman application, click on the
Codebutton to generate a code snippet of the request. For the programming language, select thecURLoption. - Copy the request URL that’s generated in this snippet to your clipboard.

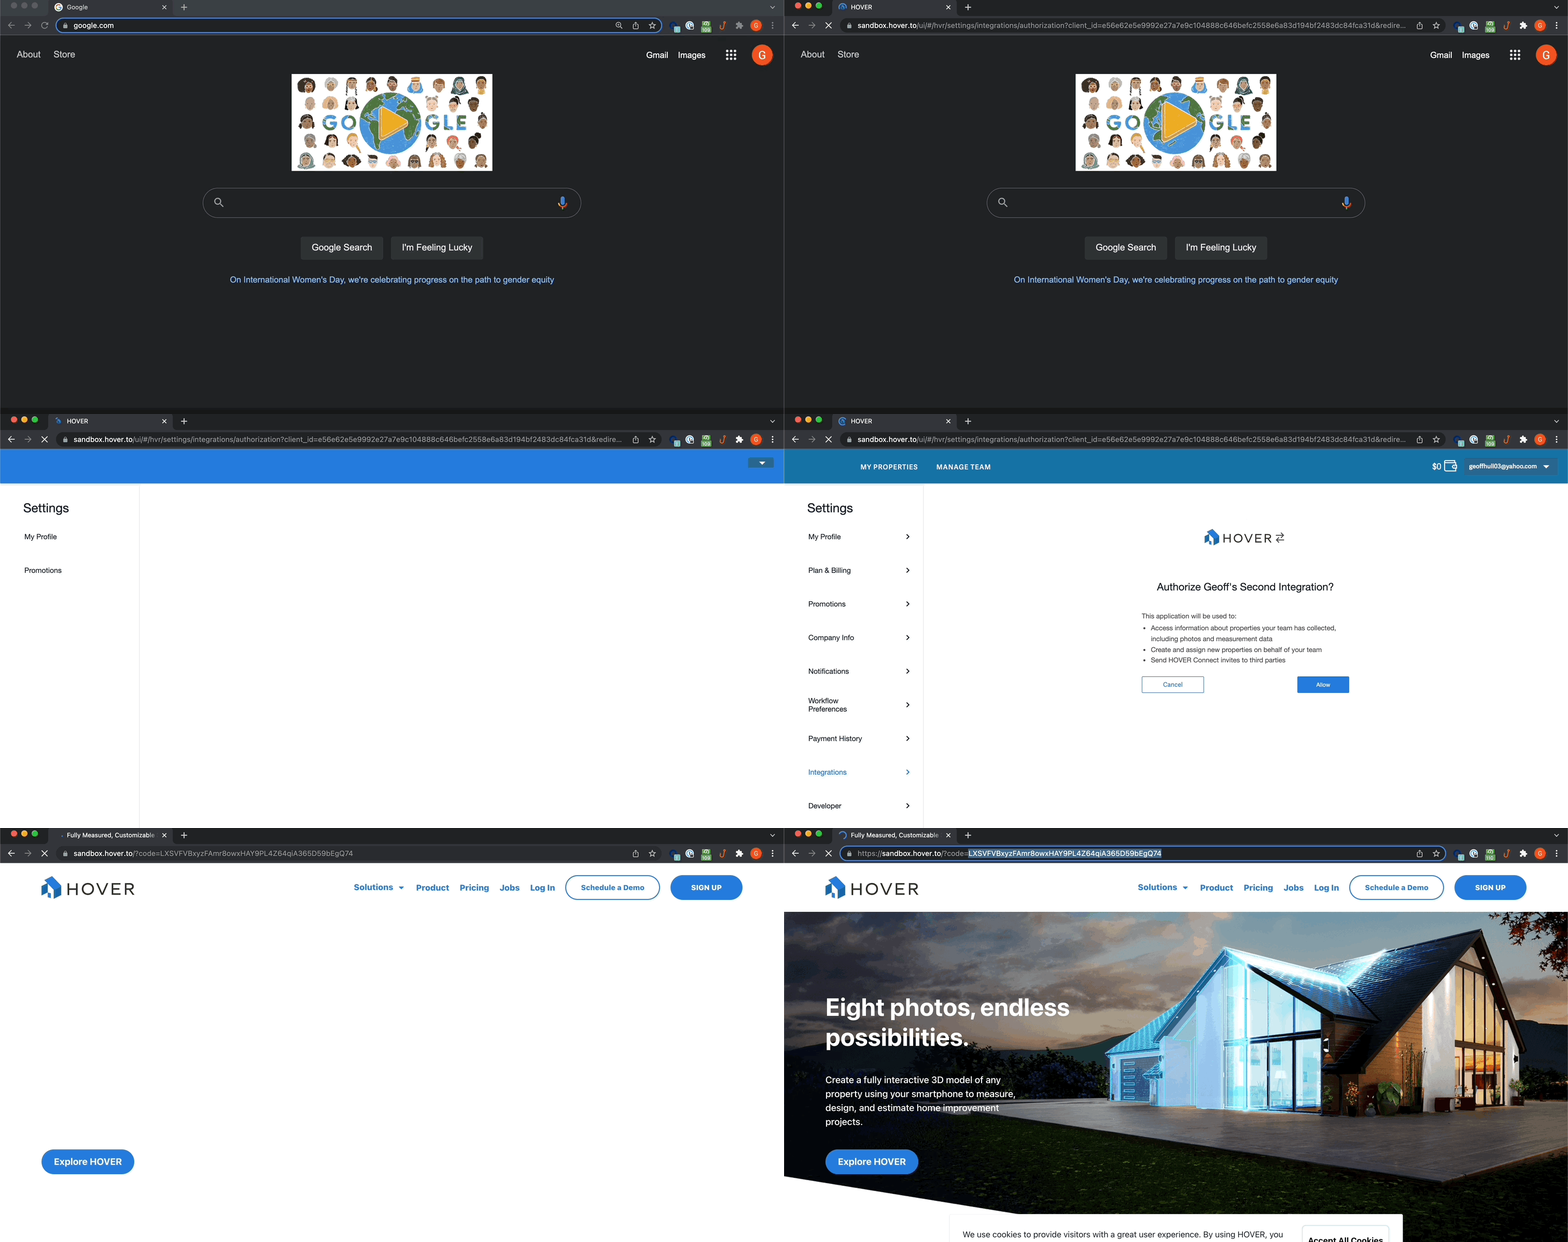
- Place the URL in your internet browser and submit the request.
- You may be asked to log into your Hover account. Once logged in, you should be directed to a page that allows you to grant your application access to the Hover APIs on your behalf. Click the
Authorizebutton. - You will be redirected to the site that you dictated as your
redirect_urlon your integration. Within the URL in your browser, your authorization code should be the final query parameter in the URL. Copy this value to your clipboard

Exchange Authorization Code for Access Token
- In Postman, navigate to the
POST Get or Refresh Access Tokenrequest from theOAuth 2.0collection. - Under the Body tab in this request, place the code you obtained in the last step as the value for the code key.
- Submit this POST request. If you set up your environment variables (in the optional step above), confirm that there are now values present for the following environment variables:
- access_token
- refresh_token
- token_created_at
Configure Hover API Collection to work with script (optional)
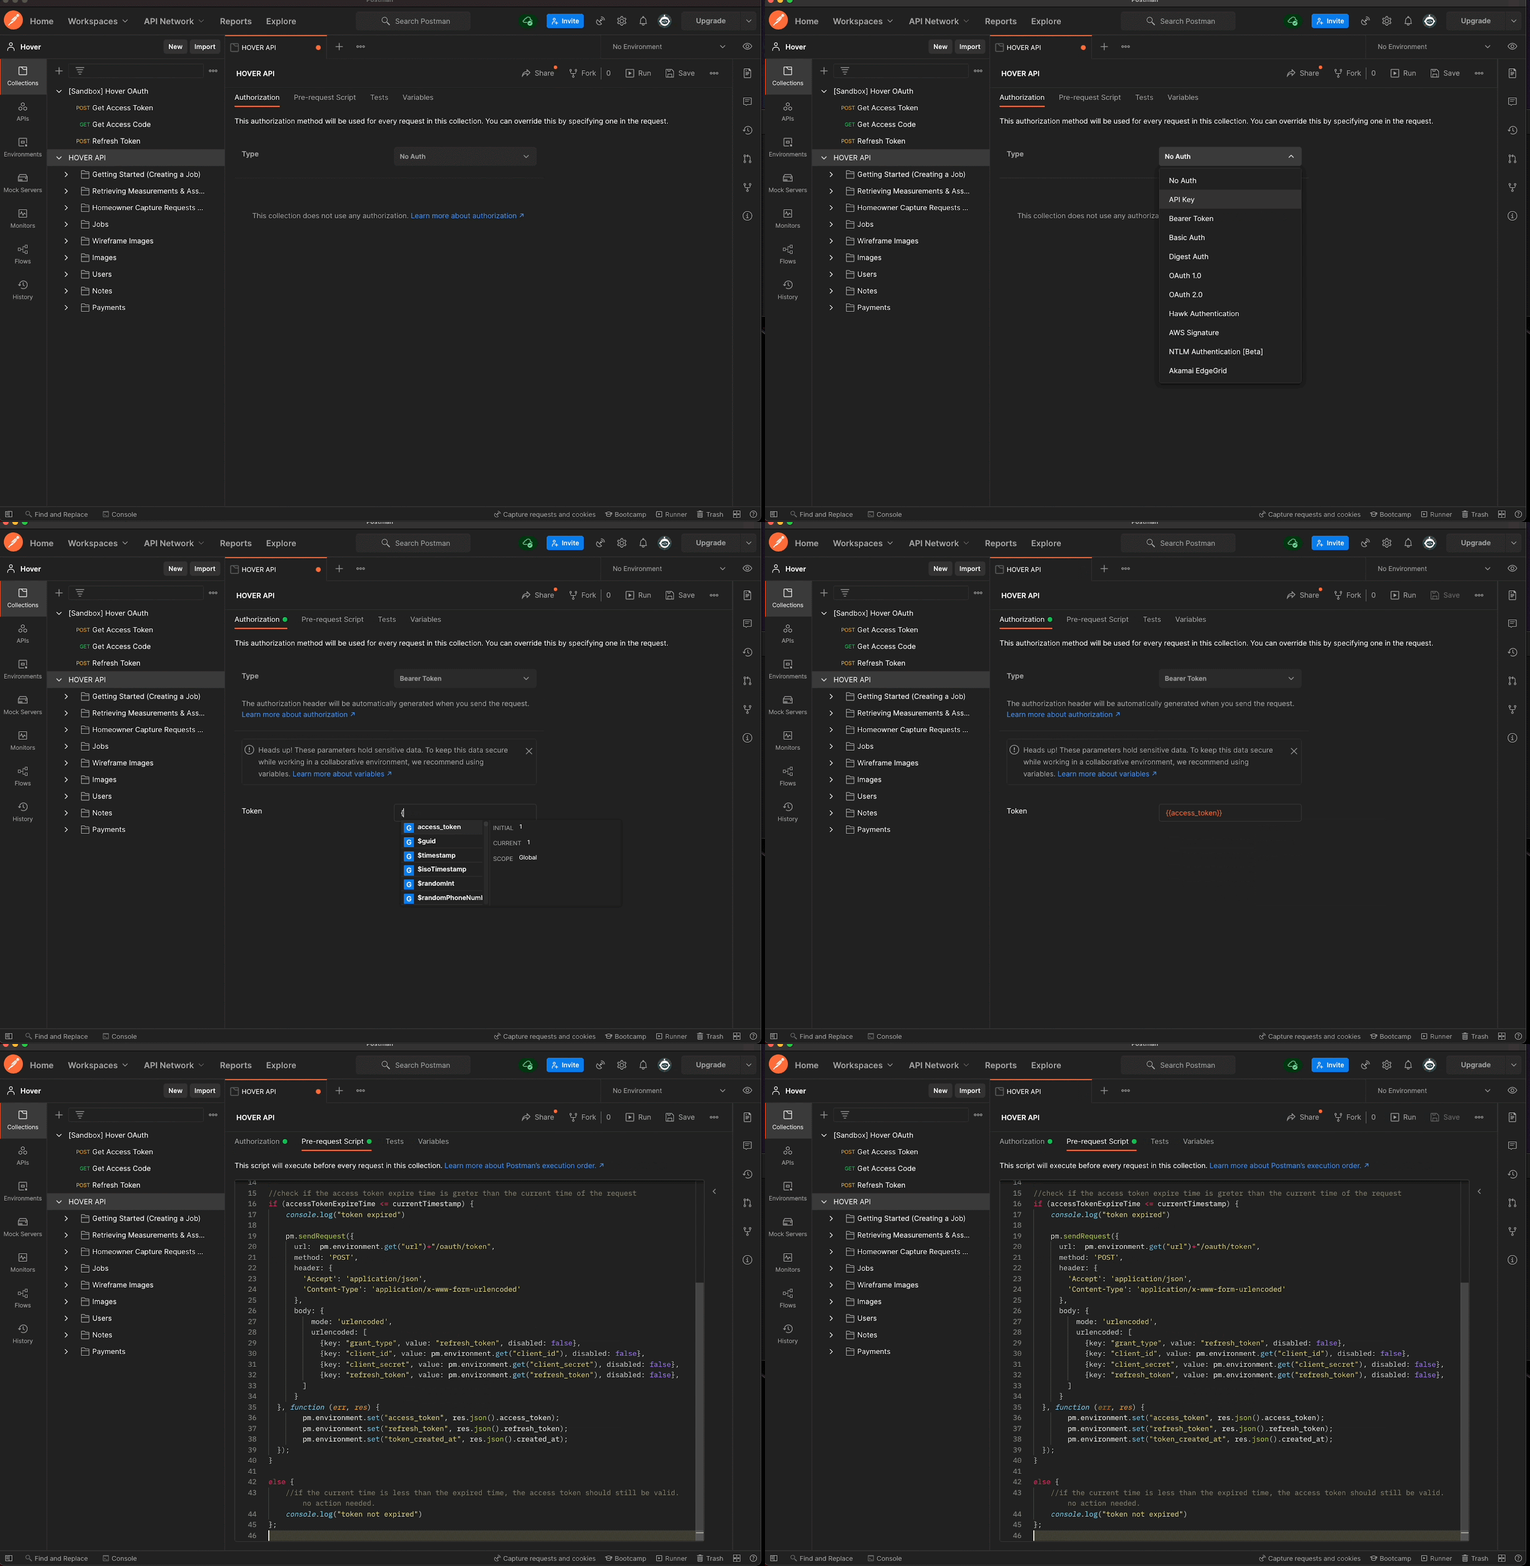
- In the parent Hover API collection, navigate to the collection’s Authorization tab. Under the authorization type selection menu, select
Bearer Token. - In the Token field, use your access token environment variable (using the double-bracket notation ⇒
{{access_token}}). - Click into the Pre-request Script tab and paste the code snippet below into the text box (comments and console.log actions can be removed, if you desire). Save your changes to the collection.
-
const url = pm.environment.get("url")

//obtain the current timestamp and round to the nearest minute
var currentTimestamp = Math.round(Date.now() / 1000)

//get the current valid access token created_at timestamp
accessTokenCreatedAt = parseInt(pm.environment.get("token_created_at"));

//add 7200 to accessTokenExpireTime to equal the time at which the access_token will expire
accessTokenExpireTime = (accessTokenCreatedAt + 7200)
console.log(currentTimestamp)
console.log(accessTokenExpireTime)
console.log(accessTokenCreatedAt)

if (accessTokenExpireTime <= currentTimestamp) {
    console.log("token expired")

    pm.sendRequest({
      url:  pm.environment.get("url")+"/oauth/token",
      method: 'POST',
      header: {
        'Accept': 'application/json',
        'Content-Type': 'application/x-www-form-urlencoded'
      },
      body: {
          mode: 'urlencoded',
          urlencoded: [
            {key: "grant_type", value: "refresh_token", disabled: false},
            {key: "client_id", value: pm.environment.get("client_id"), disabled: false},
            {key: "client_secret", value: pm.environment.get("client_secret"), disabled: false},
            {key: "refresh_token", value: pm.environment.get("refresh_token"), disabled: false},
        ]
      }
  }, function (err, res) {
        pm.environment.set("access_token", res.json().access_token);
        pm.environment.set("refresh_token", res.json().refresh_token);
        pm.environment.set("token_created_at", res.json().created_at);
  });
}

else {
    console.log("token not expired")
};

Making your first API call
Now that authentication has been set up, you can make a subsequent call to Hover's API to view data in your authenticated Hover org. To demonstrate this, select the GET List Jobs request from the Jobs folder of your Postman collection.
Hit the Send button in the top right of your Postman application to submit the request. You should receive a 200 OK response with objects that are associated with each job in your Hover org.
Conclusion
In conclusion, we've set up a Postman environment that interacts with Hover's API. We walked through the initial OAuth 2.0 authentication process and added a Pre-Request Script to the collection for indefinite authentication in this environment. Feel free to test out any of our endpoints within your organization.
As always, if you run into issues or errors when running through this tutorial, please reach out to [email protected].
Updated 6 days ago
