Obtaining Material List data using Zapier
This guide will walk you through setting up a Zapier trigger and action to obtain Material List data in Hover
Setting up the Material List Created Trigger
Must be using the Hover App with version 2.3.7 or greater.
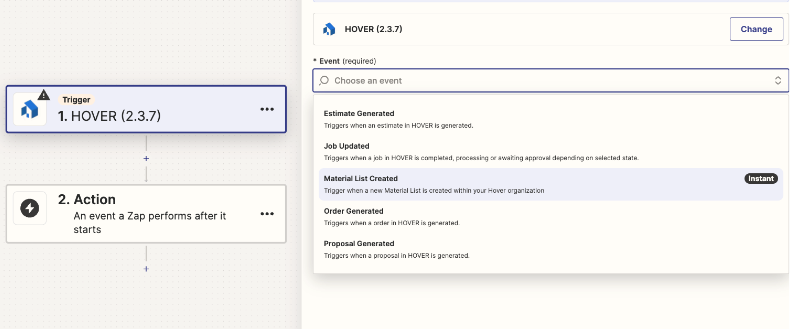
Within your Zap, select the Hover app for your trigger. For the Event, select the Material List Created option from the list of available triggers.

Click Continue.
Once you've selected this trigger, connect the Zap with an existing Hover connection or, optionally, set up a new connection. Once you've connected and authenticated with Hover, select the Test Trigger button.
This trigger is listening for specific events taking place in Hover, namely a Material List being created. Zapier cannot truly test this workflow as it's unlikely a Material List is being created in Hover while setting up this Zap. The test should work, but the test will populate with fake/test sample data within ("Material List A") that will not truly work for testing the subsequent Get Material List as Line Items action.
Manually Inputting a Material List ID for Testing
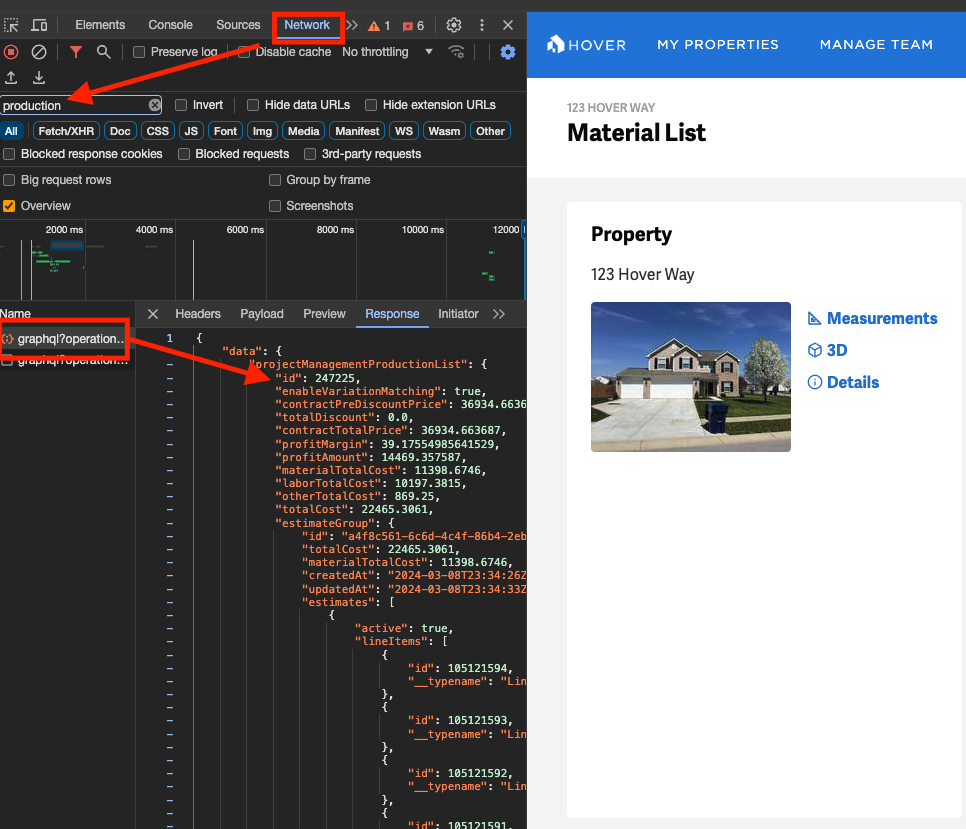
If you would like to try out this trigger with live data in Hover and conduct some end-to-end testing, you will need to pull a Material List ID (a.k.a. a ProductionManagementProductionListID) from Hover. Here are the steps to obtain one of these ID values:
- Log into your Hover account and select a project with a Material List or create a new Material List for an existing job.
- Anywhere on the Material List page, right click with your mouse and select Inspect Element.
- Click on the Network tab within your browser's development tools/
- In the search bar, type in the word production.
- Refresh the page
- Select the first option under the Name column, which should have some sort of reference to a graphql operation (
graphql?operation=projectManagementProductionList) - Click the Response header tab.
- Open the data object and take note of the
idvalue - Copy the ID value to your clipboard

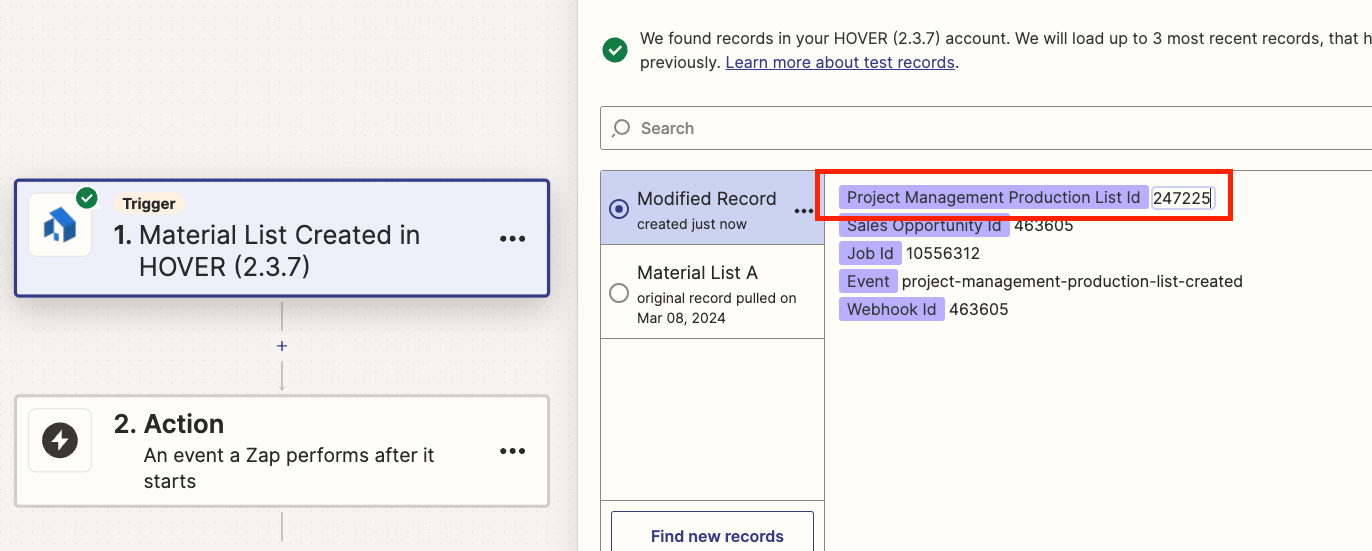
Back in Zapier, under the test tab for the Material List Created trigger, click on the Duplicate to Edit button.
This button will create a duplicate of the original test record and allow you to modify data within that example.
Open the modified record. In the Project Management Production List Id data pill, paste the ID value you copied over from the developer tools on the Hover Material List page.

Finally, click Continue With Selected Record! You are now ready to set up and test the action to Download Material List as Line Items.
Using the Download Material List as Line Items Action
Must be using the Hover App with version 2.3.7 or greater.
Select the Download Material List Data as Line Items action from the list of Hover actions and click Continue.
Next, connect the Zap with an existing Hover connection or set up a new one.
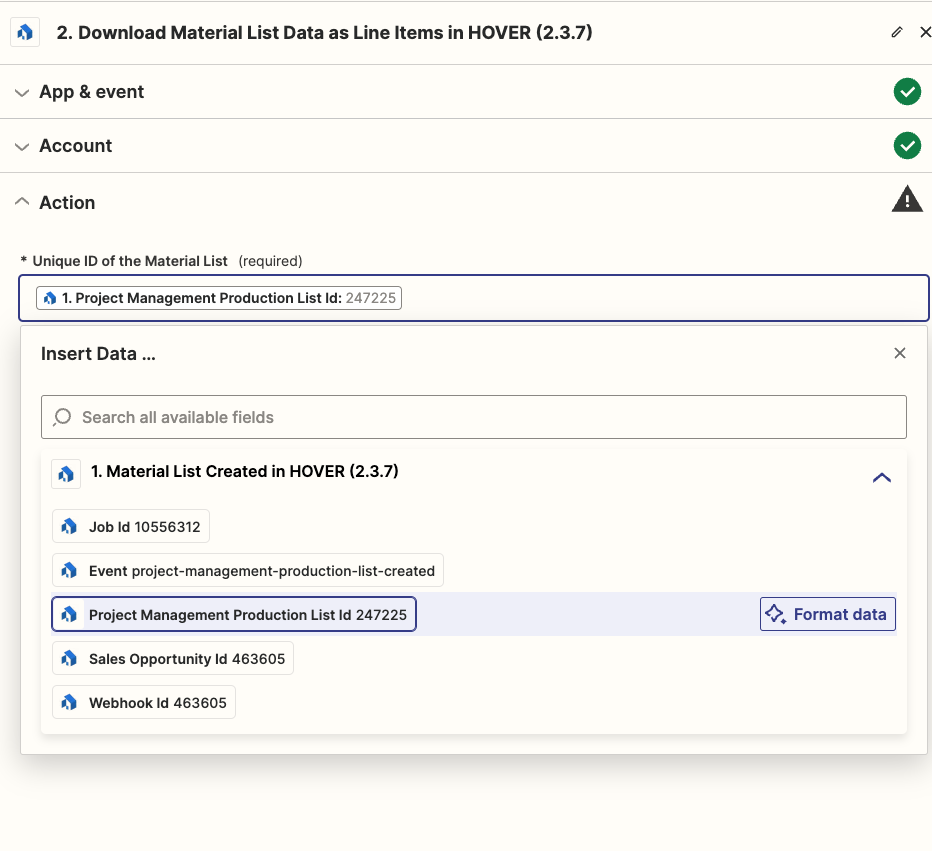
This action requires a material list ID from Hover in order to scope the request properly and pull the correct data from Hover. In this field, select the Project Management Production List Id from your selection in the Material List Created trigger.

Click Continue.
Click Test Step. You should receive a sample output of the Material List data within the Zap test. When connecting this data to other systems in Zapier, you can use to corresponding data pills to map to fields in your system(s) of choosing.
Working with Material List Line Items
By default, Download Material List as Line Items action will return all Material, Labor, and Other costs on your Material List. The output that returns may vary based on your Hover settings and configurations.
Under the hood, this action is making an API request to Hover's system to request all material list data. Within this response body, there are a varying number of material list line items that could be returned. The example below illustrates what two line items look like on a Material List:
 "listItems": [
        {
          "calculatedQuantity": 501.2176613842516,
          "color": "Primed",
          "listItemGroupName": "Hames Jardie - 7 1/4\" Lap Siding (Statement Colors)",
          "measurement": 25.82,
          "measurementUnits": "squares",
          "pretaxCost": 5522,
          "taxPercent": 0.07,
          "productCatalogProductId": "04eaf38d-12ca-4d69-b8b1-0adcabddcd46",
          "quantity": 502,
          "quantityUnits": "PIECES",
          "totalCost": 5908.54,
          "totalPrice": 9867.2618,
          "tradeType": "SIDING",
          "type": "MATERIAL",
          "unitCost": 11,
          "wasteFactor": 0.1
        },
        {
          "calculatedQuantity": 51.64,
          "color": null,
          "listItemGroupName": "Hames Jardie  - 7 1/4\" Lap Siding (Statement Colors)",
          "measurement": 25.82,
          "measurementUnits": null,
          "pretaxCost": 369.2,
          "taxPercent": 0.07,
          "productCatalogProductId": "e18b68c4-f302-4d5a-8735-a14285ad0a02",
          "quantity": 52,
          "quantityUnits": "TUBES",
          "totalCost": 395.044,
          "totalPrice": 659.72348,
          "tradeType": "SIDING",
          "type": "MATERIAL",
          "unitCost": 7.1,
          "wasteFactor": 0
        },
   ...]
  }
Zapier will automatically group similar pieces of data together. For example, if you were mapping the material quantity into a quantity field within another Zapier action, you would see all of the values for those respected fields grouped together. The sample data may look confusing, but Zapier is pulling the quantity value out of each line item (or object) and allowing you to map it into a field of your choosing.

Material List line item keys/values are grouped together automatically.
For more information, we recommend consulting Zapier's guide for working with line items.
Updated 15 days ago
